Quick Glossary!
HDR = High Dynamic Range
Exposure = How light or dark the image is, and how sensitive the image is with the light through the lens
Bracketing = The levels of exposure, can be digitally changed on most digital cameras. HDR uses 3 different levels usually.
AEB = Auto Exposure Bracketing (the camera works it out for you instead of changing settings manually)
Photographer = A term used loosley by keen amateurs who own a camera, who don't like their day job
When you see a HDR shot, you will see in my blog, that they can look slightly/totally surreal. When you stack these images, in most software you can choose the 'style' of the shot. I normally go for the 'painterly' effect. A lot of pepole like grunge, but I have heard photographers say that is not too dissimilar to vomit on a canvas.
What's the point? To photograph something that you want to capture all of the dynamic tonal range. A camera's eye does not have the range of the human eye, no matter how good a camera/lens. Some things that you shoot will have highlights/shadows to extreme to capture. And also, when you get it right - in the edit afterwards, a finished HDR image (comprising of normally 3 or more images of the same shot at different exposures), it makes you say "wow - that's pretty cool".
Skip the next two paragraphs if you're keen to get to the images/you don't speak camera.
I recently found out how to take more accurate HDR shots, putting the camera on continuous shooting, setting it to 2 second self timer, and using a 3 stop (A)uto (E)xposure (B)racketing system. This enables you to choose the level of exposure, with also another two either side of the stop you have chosen. For example, normal, under exposed and over exposed, but you get to literally scroll through the brackets of just how exposed you want. When you click the shutter, it will take three successive images, at different exposures.
Obviously this is a real help, as it saves you accidently altering the framing as you adjust settings manually, as the camera does this for you! I really like this technique, and can't believ it has taken me so long to find it! It is beneficial to HDR, as obviously you need exactly the same amount of detail/frame in every shot.
 Me looking like a chimneysweep, thanks to HDR!! HDR isn't preferred for portrait, as you can see it brings out all the highlights and shadows that you didn't know existed!

My favourite of the afternoon's shots, this comprised of 9 shots at different exposures - see how the different shades of green are picked out against the bright sky behind, which in real life looked very overcast, but this has a very nice grey/pale blue feel

The eerie wood cabin, with smashed glass and weeds all around had a particularly spooky feel, looks great in mono HDR!

HDR puddle!

Upward perspective of an autumnul tree, colour boosted by HDR, 3 exposures used.
 The back of the cabin (6 exposures)
 Colour version, 3 exposures
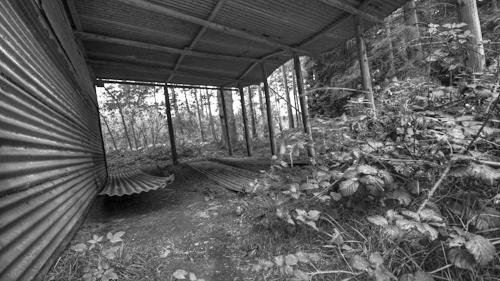
Cool lines of foreground perspective balanced by brambles!

Uprooted oak tree b+w, and below in mono, with a warm temperature

Wide view of the cabin, In 'gunge', and mono


